I had wanted this post to be a Valentine related post, but due to launching a website for my photography, A.V. Campbell Photography and the fact that my heart-shaped Macarons looked more like big blobs, this post was delayed. But hey, better late than never! 🙂
Have you ever eaten a perfectly round, light and delicious macaron and thought to yourself, “I could make these sweet little gems!”? After spending an insane amount of time in the kitchen a few weekends back making homemade macarons, I’m here to tell you that yes, it IS possible to make them. And yes, it IS possible to be successful at making them. However, it’s more enjoyable and less time intensive to buy them! 😉
There is a great amount of satisfaction that comes from making such a delicate cookie yourself. I get that. I felt that. But I guarantee, you’ll be so damn tired when all is said and done, that satisfaction is the last thing on your mind. It came to me a few days later. My intent is not to scare you from making these fancy little cookies, but rather make sure you know what you’re getting yourself into.
Although I have looked at macarons and have had that thought that I could make them, I had been too intimidated to even try. That is until I saw Sur La Table was offering a macaron making class for which I quickly signed up. The class was a little over 2 1/2 hours long and it was awesome. There were four of us in attendance. We made three different flavors, each producing 35 macaron sandwich cookies. All hyped from the class and the beautiful cookies we produced, I picked up a few baking essentials at Sur La Table, stopped at Safeway and Trader Joe’s (because it would be too easy for everything to be at one store!), came home and went to work on trying my hand at homemade macarons. Evidentially I was also a bit delusional. I can’t pinpoint exactly when reality hit. Though it certainly wasn’t when I exceeded the 2 1/2 hours it took our class to make three different recipes and I was only halfway thru one! I think I was still in a bit of denial.

Raspberry Macaron with Dark Chocolate Ganache filling!
Raspberry Macarons
1 3/4 cups powdered sugar
1 cup almond flour or meal (found at Safeway, Trader Joe’s & Whole Foods)
2 tablespoons dried, finely ground raspberry powder (I used freeze-dried raspberries found at Trader Joe’s. I finely ground them in a coffee grinder and then sifted the seeds out.)
4 large egg whites, room temperature
Pinch of Cream of Tartar
1/2 cup granulated sugar
Red gel food coloring (optional)
Preheat oven to 325. Prepare parchment paper macaron templates (this will make piping easier when you have a template to follow! 🙂 ) . Line baking sheets with template topped with parchment paper.
In a food processor, pulse powdered sugar and almond flour to form a fine powder. Add raspberry powder and set aside.
Using a stand mixer (or hand mixer if you’re a glutton for punishment! 😉 ) fitted with a whisk attachment, whisk whites and cream of tartar on medium high until foamy. Gradually add granulated sugar. Whisk until glossy white, firm peaks form.
If using, fold food coloring into meringue mixture to reach desired color. The color will fade during baking, so use enough color knowing that the macaron will come out lighter.
Fold the powdered sugar and almond flour mixture into the meringue, one-third at a time, making sure sugar/flour mixture is incorporated with meringue. The batter should be nicely firm and drip slowly from the spatula.
Transfer batter to a pastry bag fitted with a 1/2-inch plain round tip and pipe 1-1/3-inch rounds on parchment-lined baking sheet. Let stand at room temperature for 30 minutes. Check for slight crust to form. Macarons are ready to bake when they no longer stick to a finger when lightly touched.
Bake one sheet at a time, rotating halfway through, until macarons are crisp and firm about 25 minutes. If the macarons are still soft inside, lower oven to 300 degrees, cover with aluminum foil, and bake for a few more minutes.
Let macarons cool completely before filling with Dark Chocolate Ganache.
Dark Chocolate Ganache
6 ounces heavy cream
10 ounces bittersweet chocolate chips, or finely chopped bittersweet chocolate bar
2 tablespoons unsalted butter, softened
In a small saucepan, heat cream over medium-high heat to simmer. Place chocolate and butter in a medium heatproof bowl and pour hot cream over the chocolate. Let stand for 1 minute.
Slowly stir chocolate mixture with a spatula to combine, until smooth. Let cool. Use piping bag or small spatula to gently spread between two macarons.
Macarons will keep up to one week when refrigerated and stored in an airtight container. Serve at room temperature.
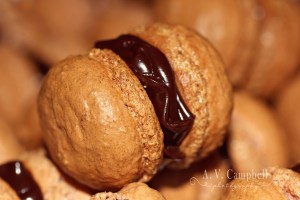
Raspberry Macaron with Dark Chocolate Ganache filling!
My Macarons certainly weren’t as pretty as the ones you see in the bakery. Although they had a good foot on them, they were taller than I’m used to seeing. I also had mixed reviews from those who tried them. My mom (the most honest person I know) didn’t too much care for them. She thought the filling was too heavy for the Macaron. My coworker however loved them!
If you don’t have any experience making Macarons and would like to give it a whirl, may I suggest you check out a few sites that provide some helpful tips: Food Nouveau how to and Food Nouveau troubleshooting. I wasn’t smart enough to check these posts out prior to jumping in as I was still on my “I can do it” high when I began. Had I actually taken a breather and displayed some patience, the whole process may have been less time-consuming and a lot smoother after reviewing the steps and tips outlined on these two links. 😉

Congrats on launching your photography site!! I checked it out and the photos are beautiful 🙂 I recently made macaroons too for the first time and they turned out good, but I definitely will be making them again soon. Loved this post!
Thank you very much for the compliment and for checking out my other site!! 🙂
What kind of Macarons did you make? I certainly enjoyed them, but making them was another story. LOL!
That Raspberry Macaron with Dark Chocolate Ganache filling looks divine! Really shows that you’re a great photographer as well.